Raku pottery is an ancient ceramic firing technique that originated in Japan during the 16th century. Known for its unpredictable, crackled finishes and smoky effects, Raku has become a favorite among ceramic artists who appreciate its spontaneous and artistic results. Unlike traditional pottery firing methods, Raku involves rapidly heating pottery in a kiln and then transferring it to a reduction chamber filled with combustible materials like sawdust or newspaper. This sudden cooling process creates unique textures, vibrant color variations, and striking patterns that make each piece one of a kind.
Table of Contents
In this article, we’ll walk you through the complete process of making Raku pottery—from selecting the right clay and glaze to firing and finishing techniques. Also, we will give you some raku pottery ideas. Whether you’re a beginner exploring the craft or an experienced potter looking to refine your Raku skills, this step-by-step guide will help you create beautiful, handcrafted pottery with this dynamic firing method.
Supplies Needed to Make the Pottery
Before starting, gather the following materials:
- Clay suitable for Raku firing: Opt for clay bodies that can withstand thermal shock, often those with added grog or sand.
- Raku glazes: Specialized glazes designed for the Raku process.
- Kiln: A Raku kiln or a kiln capable of reaching temperatures around 1,800°F (982°C).
- Safety gear: Heat-resistant gloves, safety glasses, and protective clothing.
- Reduction chamber: A metal container with a lid, such as a trash can, for post-firing reduction.
- Combustible materials: Materials like sawdust, newspaper, or leaves create a reduced atmosphere.
Clay Used for Raku Firing
Clay Body
Choose a clay body with a high grog content to enhance thermal shock resistance. This composition reduces the risk of cracking during the rapid temperature changes inherent in Raku firing.
Color of Your Clay
The clay’s color influences the final appearance of your piece. Lighter clays highlight glaze colors, while darker clays can impart a subdued, earthy tone.
Raku Glaze Used for Firing Methods
Raku glazes are formulated to mature at lower temperatures. They often contain metallic oxides, which react during firing to produce varied effects. Experimenting with different glaze recipes can yield unique results.
Kiln or Kilns Used for Raku Firing
A Raku kiln is typically fueled by propane and designed for easy access during the firing process. Its construction allows for rapid heating and cooling, essential for achieving Raku’s characteristic effects.
Raku Firing Materials Needed
Very Long Metal Tongs
Long-handled tongs are essential for safely removing hot pottery from the kiln. Ensure they provide a secure grip to prevent accidents.
Safety Gear
Protective equipment is crucial. Wear heat-resistant gloves, safety glasses, and non-synthetic clothing to shield against burns and sparks.
Reduction Chamber
A metal container, like a lidded trash can, serves as the reduction chamber. This chamber traps smoke and gases, influencing the final appearance of the glaze.
Combustible Material
Materials such as sawdust, newspaper, or leaves are placed in the reduction chamber. They ignite upon contact with hot pottery, creating a reduced atmosphere that alters glaze colors and produces unique surface effects.
Creating Your Design and Shaping the Clay
Begin by conceptualizing your design. Raku pottery can be wheel-thrown or hand-built, allowing for a wide range of forms and textures.
How Thick Should You Make Raku Pottery
Aim for uniform wall thickness, typically around 1/4 inch (6 mm). The consistent thickness helps prevent cracking during the rapid heating and cooling phases of Raku firing.
Bisque Firing the Raku Pottery
Once your piece is dry, bisque fire it to approximately 1,800°F (982°C). This initial firing strengthens the pottery, making it easier to handle during glazing and the subsequent Raku firing.
Glazing the Bisqueware Before Raku Firing
Apply Raku glaze to your bisque-fired piece. Techniques such as dipping, brushing, or spraying can be used, depending on the desired effect. Ensure the glaze application is even to avoid imperfections.
Other Raku Decorating Techniques to Consider
Stains and Oxides
Applying metal oxides or stains can add depth and variation to your pottery’s surface. These materials react uniquely during firing, offering a range of colors and patterns.
Wax and Film Resist
Using wax resist involves applying wax to areas you want to remain unglazed. This technique creates the contrast between glazed and unglazed surfaces, adding visual interest.
Tape Resist
Tape resist involves placing the tape on the pottery before glazing to create patterns. After glazing, the tape is removed, leaving distinct designs that contrast with the glazed areas.
Safety Tips
| Safety Tip | Description |
|---|---|
| Work in a well-ventilated area | Firing releases fumes that can be harmful if inhaled. |
| Keep a fire extinguisher nearby | Always be prepared for unexpected fires. |
| Wear appropriate safety gear | Protective clothing, gloves, and eye protection are essential. |
| Avoid synthetic clothing | Synthetic materials can melt and cause burns. |
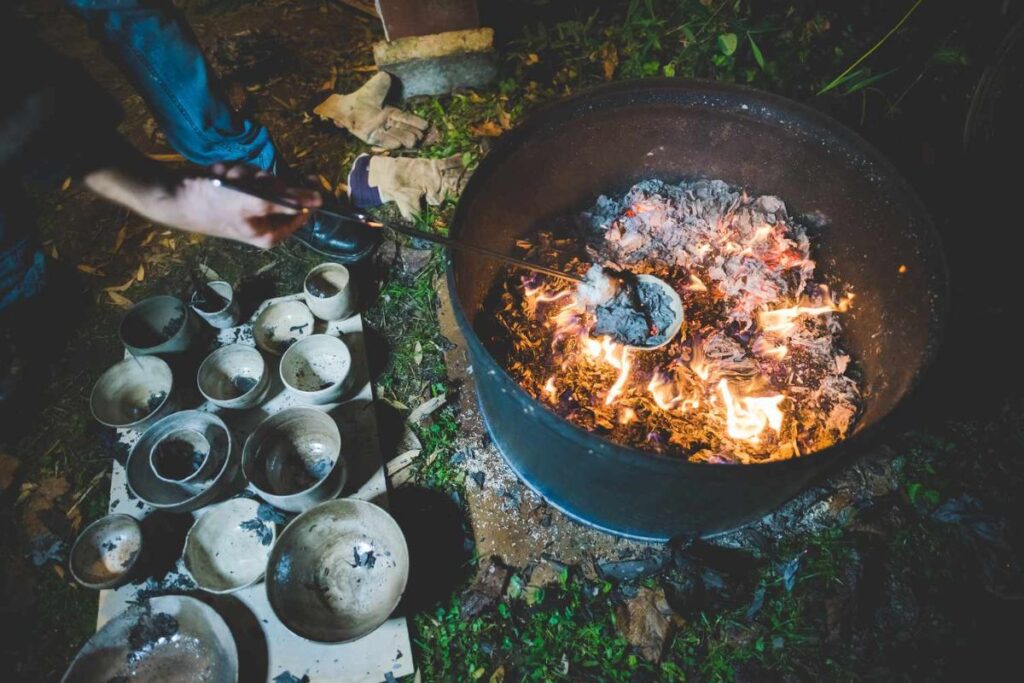
Raku Firing Process
- Preheat the kiln: Bring the kiln to the desired temperature, typically around 1,800°F (982°C).
- Load the glazed pottery: Carefully place your glazed pieces into the kiln.
- Monitor the firing: Watch for the glaze to mature, indicated by a glossy appearance.
- Remove the pottery: Using long tongs, extract the hot pieces from the kiln once the glaze has matured.
Raku Kiln Firing Time Example
Firing times can vary, but a typical Raku firing might take about 30 to 60 minutes to reach the desired temperature. Always monitor the kiln closely to achieve optimal results.
Raku Pottery Ideas
Here are some creative Raku pottery design ideas to make your pieces stand out:
1. Crackle Glaze Patterns
- Use clear or white crackle glaze to highlight deep, dark crack lines.
- Enhance cracks by rubbing in stains or oxides for contrast.
2. Naked Raku
- Apply a slip-resist that burns away in firing, leaving blackened, raw clay with stunning organic patterns.
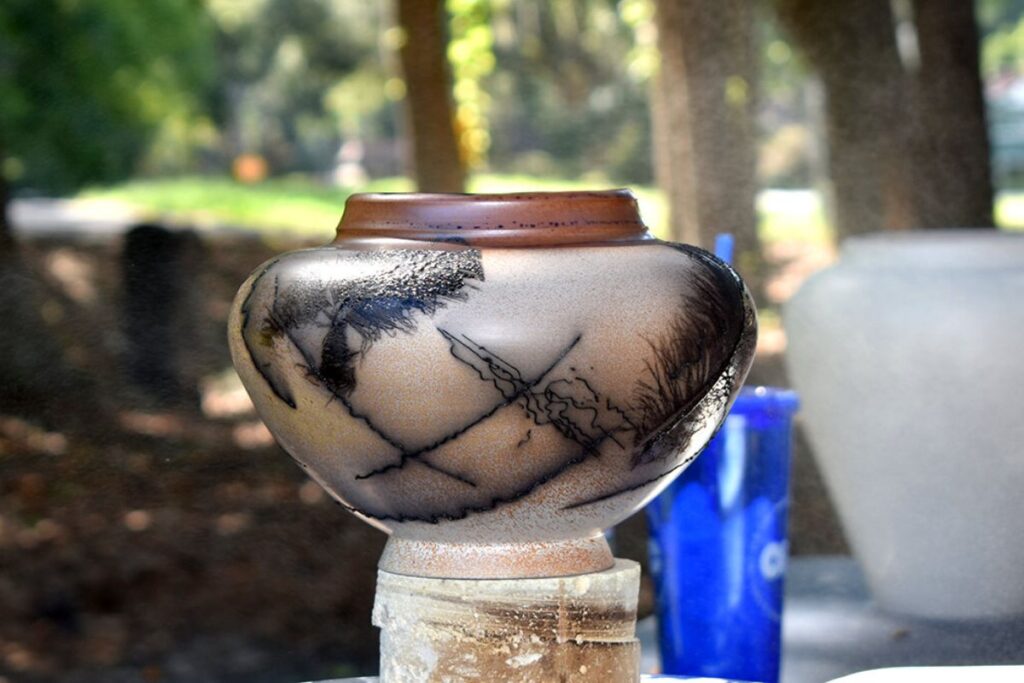
3. Horsehair Raku
- Lay strands of horsehair or feathers on hot pottery to create unique carbon markings.
4. Geometric Tape Resist
- Use heat-resistant tape to block off areas before glazing, creating clean, bold geometric shapes.
5. Metallic and Copper Effects
- Experiment with copper-based glazes and a strong reduction process to achieve iridescent or rainbow-like hues.
6. Carved or Stamped Textures
- Add carved designs or stamps before firing to create intricate textures that enhance glaze effects.
7. Saggar Firing with Organic Materials
- Wrap pieces in foil with salt, coffee grounds, or banana peels to create natural fuming effects.
8. Raku Sculptures
- Move beyond functional pottery and create sculptural forms like masks, abstract art, or figurines.
9. Layered Glazes for Depth
- Apply multiple layers of glazes or slip-trailing for a textured and dynamic surface finish.
10. Gold or Wax Finishing
After firing, apply gold leaf, acrylics, or wax for a polished and refined final touch.
Conclusion
Raku pottery is a unique and exciting process that blends artistry with unpredictability. From selecting the right clay and glaze to mastering the firing and reduction process, each step contributes to the final, one-of-a-kind piece. While Raku firing requires careful handling and safety precautions, the reward is the stunning, unpredictable textures and finishes that make every creation special.
Whether you’re a beginner or an experienced ceramic artist, experimenting with different techniques, glazes, and reduction materials will help you refine your skills and discover new artistic possibilities. Embrace the imperfections, enjoy the process, and let Raku pottery bring creativity and spontaneity to your ceramic work.
For a better visual understanding, you can check the video below. It explains the step-by-step process of Raku pottery.

I’m Farzana, a writer with over 5 years of experience and a genuine passion for business, home improvement, fashion, and digital marketing. I love creating content that’s engaging and easy to relate to—whether I’m breaking down a marketing strategy, sharing simple home tips, or exploring the latest style trends. Writing allows me to connect with people across different interests, and I’m always excited to bring a fresh, practical perspective to every topic I cover.